How to decode your data… in five minutes flat
There’s little point uploading your rides to Strava if you’re not going to study the data. In just five minutes, you can learn how to train smarter and race faster, as Jim Cotton explains

The latest race content, interviews, features, reviews and expert buying guides, direct to your inbox!
You are now subscribed
Your newsletter sign-up was successful
Want to get faster in five minutes? Want to rule the club run, or boss the bunch sprints at your local crit?
The answer probably doesn’t lie in your wallet or the ‘Marginal Gains’ menu of your favourite online retailer, but it may lie in the numbers and graphs you’ve been ignoring on Strava.
>>> Nine things you wish you’d known before you joined Strava
Learning to analyse your ride and understand your data is a powerful way to get fitter and faster. Fear not, a ride file is not the terrifying minefield of science and stats that will bring you out in cold sweats with flashbacks to school textbooks. Just five minutes of analysis can identify weaknesses or what went wrong on a ride, giving you something to focus on next time.
>>> How to use training software to hit peak form
Most training platforms — Strava, Training Peaks, Today’s Plan, etc — work in a similar way and present data consistently. Rather than unpicking the differences between them, we’ll stick with the near-universal language of Strava. Everyone has Strava, right?
The clock is ticking, let’s go:
The latest race content, interviews, features, reviews and expert buying guides, direct to your inbox!
00:00:00—00:00:29 - The basics
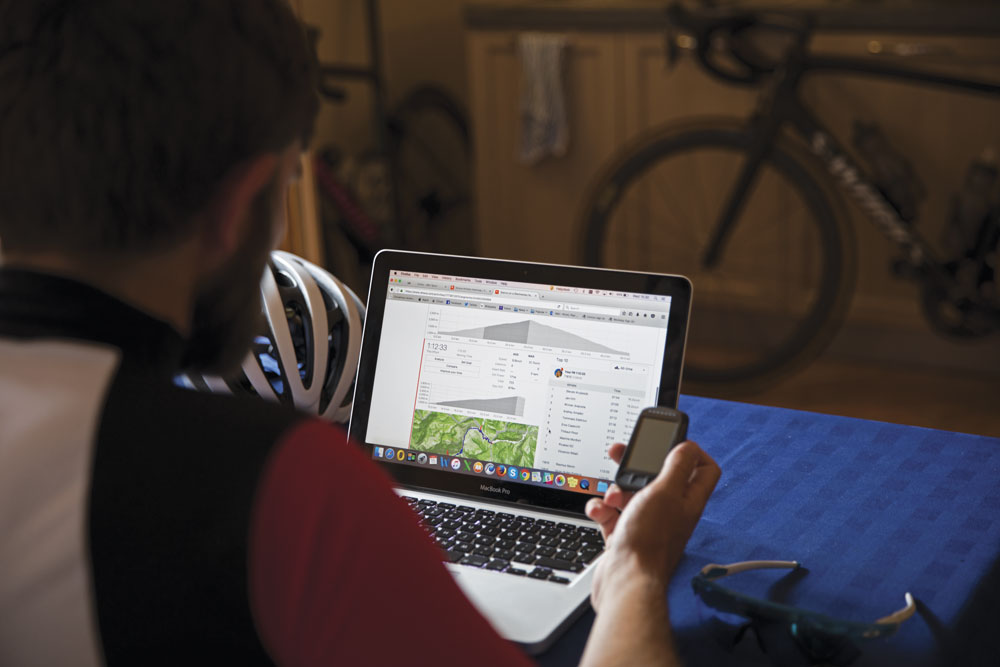
First, you’ll want to get a feel for how your ride went as a whole. The answers lie in the main ‘Overview’ tab on the Strava desktop site. If you’re using power, the Weighted Average Power number (referred to as Normalised Power in most other platforms) gives you an instant insight into how ‘hard’ the ride was.
The number is based on a calculation that is weighted towards the parts of the ride where you were working hardest, e.g. the intervals or hill repeats.
Dr Tom Kirk of Custom Cycle Coaching explains: “When you’re going hard, that part of the ride takes more of a toll on your body, and so is weighted higher in the equation. It’s a measure of the physiological cost of a ride.”

Average power is a useful number to look at if you were riding steadily, without particular surges in pace or effort; for example, in a time trial. On less consistently paced rides, bear in mind that averages can be deceptive.
The other area to look at for a good quick assessment of your ride is heart rate. Your average heart rate gives a good indication of how hard your whole body worked during the session.
>>> Cycling training zones and how to use them
Tracking trends in average heart rate is an effective way to quickly assess your fitness over the season — a decrease in this number over time, on rides of consistent pace or power, suggest you’re getting fitter. Your maximum heart rate is a great indicator of whether you totally buried yourself in that cafe sprint or whether there was more to come. No one can ask for more than your max!
00:00:30—00:02:29 - Pacing and sustainability of efforts
Now you’re ready to open up the ‘Analysis’ tab of the Strava desktop site. The graphical illustration of your performance through the ride can be a little intimidating at first, but those lines can soon be broken down and deciphered, revealing a huge amount in a very short amount of time.
Your power line is an instant way to see how well you managed your effort through the ride. If you were trying to ride steady throughout, a quick look at this line will show whether you mastered your pacing and held a consistent power.
If you’re doing intervals and trying to hit the same power each time, the power line becomes even more valuable. During the session, hitting ‘Lap’ at the start and end of each effort means you’ll be able to make use of the ‘Lap’ tab in Strava to home in on each discrete effort.
By looking closely at each effort, you can see not only how well you handled each individual interval, but if you managed the whole session well. Assessing the consistency of the intervals can give you a great target for the next session, whether that’s aiming for a higher number or being — ahem — a little more realistic.
If you don’t use power, heart rate in isolation can give you a good indication of whether you were pacing yourself suitably. For efforts near or over your lactate threshold — the point at which your body struggles to maintain a steady state and falls into oxygen deficit — you will see your heart rate rise throughout each effort (until it hits max or you stop).
Kirk again: “Your heart rate continues to rise, as your body’s oxygen demand is above a level your body can easily tolerate” — that is, you’re working at the top end of your ability. Looking at the severity of the increase in your heart rate over an effort is a great way to judge whether you’re getting fitter over the season and whether you were riding at an appropriate intensity for that ride.
“It’s all about the speed of the rise of your heart rate — if it increased very quickly over an interval, a time trial, or a mountain climb, you need to consider whether it was a sustainable effort in the wider context of the ride,” Kirk explains.
If you’ve been performing intervals, learning how to read the shape of your heart rate line is a great way of planning your next session. Fast increases in your heart rate, or a heart rate that never stabilises within an effort, suggest that you were on the rivet and that you should repeat the session at the same or lower level of effort before attempting to push up the numbers.
However, heart rate lines that stabilise after a short period suggest you were relatively comfortable with the intensity — perhaps you could challenge yourself and push harder next time. Furthermore, your heart rate will rise through the course of an entire ride, as well as within each specific effort within it. This is known as ‘cardiac drift’, and is a symptom of your body tiring and your core temperature increasing.
It’s also worth bearing in mind that an unexplained, sharp rise in heart rate may signal a heart rhythm problem — more common than you might think. If you're certain it wasn't a glitch in your monitor, get yourself checked with your GP.
Stephen Gallagher, data wizard at Dig Deep Coaching, explains how analysing segments in Strava is a great way of quickly reviewing your fatigue over a ride: “Comparing your power relative to your heart rate in similar segments at the beginning and end of the ride shows how well your body reacted to the session and illustrates your pace management.”
So, if your power was similar in both segments, but your heart rate massively increased, you went out too hard; there is a large cardiac drift. However, if your power and heart rate were consistent in both segments, your body coped well and you got your pacing right.

00:02:30—00:03:59 - Unexpected peaks or troughs?
Next, the nuances. Even slight peaks and troughs in your power or heart rate can have a lot more significance than you may think, and are often a result of factors beyond just your fitness or pacing.
One thing that may occur in longer, more competitive events is a sudden jump in your heart rate. The obvious cause may be a sudden surge in effort, but if that doesn’t explain it, consider your fuelling and hydration.
“A large rise in heart rate is normally down to dehydration; your blood plasma decreases, making your blood thicker, and so your heart needs to work harder to pump it around,” Gallagher explains. An increase in heart rate also points to glycogen depletion — the dreaded jelly legs of a bonk. As Gallagher points out: “If you’re dehydrated, you may bonk — if you’d been drinking [sports drinks] you’d have been taking on carbs too.”
Conversely, a slow, steady drop in your heart rate or power through a ride suggests muscular fatigue. Over an epic session, as your whole system tires, this lack of energy and muscular breakdown will reveal itself in a declining power output and heart rate.
Shifts in heart rate and power while riding in the mountains may be caused by altitude.
“When you start going over 1,500m, it’s harder to put out watts, and you need to consider this in your pacing.”
So, if you were climbing Mount Teide on your winter training camp and saw a drop in your power when you felt you were giving it everything, it was probably due to lack of oxygen.
00:04:00—00:04:59 - Set it in context — progress and tactics
If you have inputted your Functional Threshold Power (FTP) or maximum heart rate into Strava, you will also see a training load figure relating to your power (typically called TSS in other training platforms), and ‘relative effort’ score based on your heart rate (previously called a ‘Suffer Score’). These metrics summarise the amount of time you spent in each of your power and heart rate zones.
The Training Load metric helps monitor your training progression over time, and to assess just how ‘big’ a single ride really was. If you’re looking to increase your overall training output, or if you’re being vigilant about overtraining, these are the stats to watch like a hawk.
‘Safe’ or tolerable weekly total load scores are unique to everyone, depending on their fitness and type of riding. However, to safely build fitness without risk of doing yourself a mischief, it’s best to increase your total stress by around 10 per cent per week for four weeks, before taking an easy week, and then starting again.

These scores can sometimes be deceiving, however. Alex Dowsett, rider with Katusha-Alpecin and founder of Cyclism coaching, explains a flaw in the Training Load metric: “It barely recognises doing a 10-mile time trial. You can ruin yourself riding above threshold for 20 minutes but only receive a low training load number.”
So don’t get too caught up in these numbers, and always remember to think about how your body feels during and after the session.
One last thing to consider for a group ride or race is identifying how others rode. Did all your mates drop you on the final hill of the club run? Or maybe you lost time in the return leg of your TT? One of Gallagher’s hacks when analysing pro riders’ files is to get on to Strava and look at the files of others on the event.
Picking through the numbers of your opponents may reveal that they rode smarter than you, or may show just how many more watts you need in order to bag that KOM.
“Hunt down other riders’ files; compare their data to yours and pick up pacing tips and ride strategies. Of course, heart rate numbers are very personal, but it’s still interesting to see how another rider’s heart rate reacted over prolonged periods of time and where they put out power,” he suggests.
Decoding the Marmotte
A five-minute assessment of my La Marmotte 2018 ride file, with help from Dig Deep Coaching’s Stephen Gallagher

Step 1: The basics
Moving time: 7:03:04
Weighted average power: 214W
Average HR: 140bpm
Placing: 123rd
Training load: 506
Relative effort: 776
Step 2: Pacing and sustainability
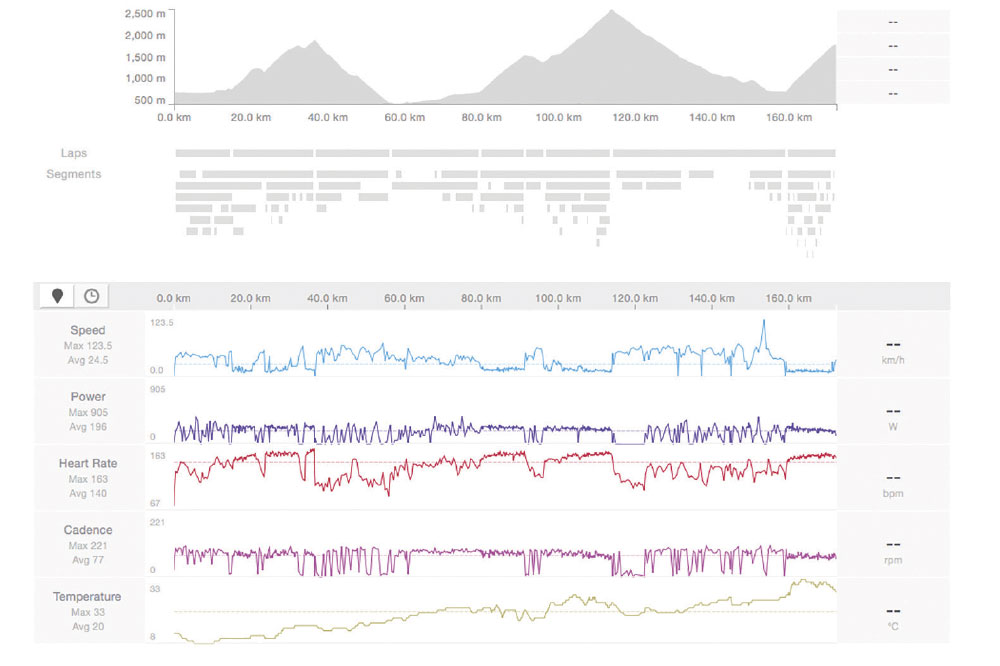
Bracketed areas on the file indicate the key areas to assess consistency of effort — the four huge climbs. To survive a huge day like La Marmotte, it’s key to take all four cols at a reasonably consistent and sustainable pace.
“Your heart rate and power lines were quite consistent throughout all the climbs,” Gallagher reassures me, “and your endurance is good — the cardiac drift isn’t too bad. Look at the segments: 228W and 147bpm on the Glandon, and 215W and 149bpm on the Alpe d’Huez. Losing only 13W and gaining 2bpm is actually pretty good.”
For a brief moment, I pat myself on the back — but then Gallagher moves on to the negatives.
My ride data reveals periods of rashness and over-exertion; the first circle shows a rapid heat rate increase at the top of the Glandon, indicating that I pushed too hard to reach the neutralised descent. Compare this, for example, to the relatively slow rise in heart rate on the Telegraphe — a more steadily paced climb.
The second circle shows elevated heart rate in the valley section. When I should have been sitting pretty in the wheels, I worked hard to drive a group, and this marks an unnecessary burning of a match that I should have saved for the final hour.
Step 3: Other factors
You’ll notice a decline in power on the Galibier, where my output drops despite my heart rate staying high (third circle). At this point, the altitude of a climb topping out at 2,600m is playing its part: “With the thin air and inability to translate effort into power, your output drops. However, there’s only around a 20W drop in your power from the start to the end of the climb, showing you tolerate altitude well,” remarks Gallagher.
The decline in my power on the Alpe d’Huez can be interpreted alongside the heart rate line (fourth circle). Gallagher explains that here, despite the rising temperature indicated at the bottom of the graph, the drop in power isn’t due to dehydration.
“Dehydration would have been illustrated by decreasing power and increasing heart rate. Instead, the way in which your heart rate line and power line decline together suggests muscular fatigue: you’ve simply started to peter out.”
Step 4: Broader context
A training load of 506, and relative effort of 776 is huge, and clearly represents the duration and intensity of the ride. A load such as this requires significant recovery time — I felt incapable of doing much for many days after!
Before heading back for Marmotte 2019, Gallagher advises some Strava-stalking: “Find those who did better than you this year, pick out some key moments from the ride, and see what they were doing.”